Planning and constructing a GRASS database
You should take extra care when creating the project area (the location). The structure is determined by the used data.
The following section will demonstrate three methods for importing scanned maps with georeferencing. The first is a resolution-independent way, that is most useful for compensation of scanning errors. In this case you will leave the calculation of GRID RESOLUTION to GRASS. The other two examples are used for calculating the extension and the resolution of a location, supposing that scan errors are non-existant or at least negligeable.
You need to be aware of the relation between geometrical length, scale and geographical extension. This general cartographical relation is also valid when transforming an analog map into a digital map. Since you will most probably be using a scanner (at least to create a backdrop map for the vectorisation within the GIS), these terms are of great importance. Also, you should obviously not forget about copyright restrictions when scanning maps.
When using digital maps that have not only been scanned (for example by a governmental institution) but also already geocoded (or completely digitally created) the data structure and the import are greatly simplified. The data structure can be deduced from the information about the digital map concerning geographical borders and resolution.
General definition of a project area when using scanned maps
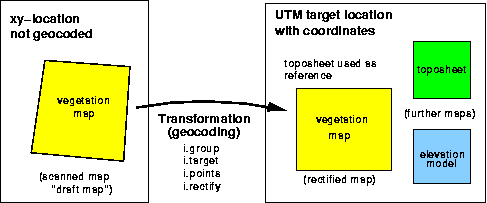
During the scanning process it is next to impossible to lay down the map perfectly straight. In consequence, the scanned map will always present a slight rotation away from the northern orientation which is unacceptable when working with GIS. We will, therefore, present as a first method one that requires a little more work and time, but which allows an exact import of maps through the correction of the position with the help of reference points.
This method can be considered a universal method for importing scanned maps. However, in this case you will have to define two project areas with different projections. First, the scanned map is imported into a simple xy location (without projection) and then rectified (geocoded) in a second location with the chosen coordinate system:
Example: You have scanned a map at 300dpi. This map we call the ``raw map''. In the Section called Definition of a project area with predefined geographical resolution you will find the necessary calculation methods in order to determine the correct scanning parameters. It is useful to use a map which already provides marks at the cross sections of coordinate lines. These marks represent important coordinate points for the rectification of the map. You should scan the map a few percentage points larger than needed in GRASS later, so that the marks that are on the edge of the region of interest are clearly visible. Note : The edge of the paper is generally not parallel to the coordinate lines of the projection system. This means that you cannot use the paper edges as location edges.
Before rectifying the raw map, you should first create the location in the actual projection system you will be using for your map, with the required geographical boundaries and resolution (see the chapter called Set-up your location). Any projection supported by GRASS may be used. You should watch out that the resolution of the target location is not too low since that could cause the digital map to be quite illegible, depending on the scale. It is, therefore, worthwhile to begin by calculating the transformation between scanning resolution and geographical resolution.
Once the new location has been created, you have to leave GRASS again in order to restart it for the creation of the xy location (GRASS cannot switch between locations on-the-fly yet). Later, the rectification module will transfer the map that has been imported into this xy location to the new location and adapt the orientation and the resolution according to the parameters of this projection.
Now the xy location needed for the scanned raw map has to be created. It has to have an extension of at least the number of pixels of the imported map in both directions (x and y). The resolution will be 1 pixel, as usual for xy locations . There actually is a relation to a geographical resolution (in meters, for example), but this relation is of no importance in a location without projection such as xy locations . The "real" resolution (that has been determined through the scanning resolution and the map scale) is relevant only during the transformation into the new projection location .
If the map can only be scanned in several parts due to its size, all map parts are to import into the same xy location . This xy location has to be created large enough in order to hold all parts, i.e. you will have to choose its size according to the largest scanned map part. Since locations sizes can be freely chosen in GRASS, you can define an even larger location "just to be sure". To find out the size of your scanned raw map in pixels, you can use the ImageMagick program mentioned in the previous section.
You should by now have created two locations : one xy location for the raw map and one projected location into which the raw map shall be rectified, i.e. geocoded. You will find the instructions on how to import and rectify the scanned map in the chapter called Processing Scanned Maps.
Definition of a project area with predefined geographical resolution
This method for the creation of a location supposes that the boundaries of the project area are known and the scan parameters have to be adapted for a map that is to be scanned (and that can be scanned with no or negligeable errors).
The number of raster cells in a location results from the length and width of the project area as well as the resolution, chosen according to the required precision of the results resolution grid resolution (GRID RESOLUTION).
Example: Let the length of a square location be 1 km, with a wanted resolution of 5m per cell (GRID RESOLUTION). Thus:
1,000m/5m = 200 rows (or columns) => 200*200 raster cells
If, for example, a scan map is to be scanned for this region, it has to contain 200 x 200 rows and columns in order to be imported without distortion. Therefore, in this case, it is the location that determines the scan resolution since the lenght and width of the scanned area are determined by the borders of the location . This is similar for any other data whose resolution also has to be adapted (e.g. digital elevation model with defined raster width).
Now we need to find out which resolution has to be used when scanning, in order to achieve this number of rows and columns at a fixed side length. In this example we will assume a scale of 1:25000 on the map to be scanned. Thus, the location length of 1000m becomes:
100,000cm/25,000 = 4cm,
i.e. 4cm on the map. The scanning resolution of this map that is to be imported is calculated as follows:
raster rows (or columns) / side length of the map = 200 rows (or columns) / 4cm = 50 rows / cm
In dpi (dots per inch, equivalent of rows or columns per inch) this becomes:
50 rows x 2.54 inches = 127dpi
This value has to be set in the scanner software, as well as the section of the map that corresponds to the geographical boundaries of the desired area that is to be scanned. Each map scale will result in a different resolution. The latter has to be chosen big enough in order to keep small map texts legible. While scanning, it is almost impossible to achieve the exact number of rows and columns and a perfect orientation of the map. In this method, one is therefore obliged to rework the scanned map with imaging software (as for example the netpbm-tools, which you can find at http://netpbm.sourceforge.net/.
Now we will look at an alternative method for the definition of the project area depending on the data that is to be processed.
Definition of the project area without a previously defined resolution
This third method for creating a location is to be used when the resolution within the location location can be chosen freely in function of a scanned map (or any other given data). Here the parameters of the location are derived from the data. scanning The image to be imported and the location must have the same number of raster rows and columns. You can find out these values with the help of the ImageMagick program, available at http://www.imagemagick.org/. Use its identify command or open the scanned map, right-click on it and chose "Image Info".
Which distance in nature corresponds to which length of a raster cell is determined by the chosen scanning resolution. This values needs to be entered as the GRID RESOLUTION during the creation of the location (see coordinates entry form on page locationform ). It is important not to change the image size since that would alter the scales within the image.
It is recommended to work with a scanning resolution somewhere between 150 and 300 dpi (color image with 256 colors), with labels on the map being legible. The raster resolution within GRASS (GRID RESOLUTION of the location is derived from that. Here is an example of how to calculate the resolution of a square location . Let us assume a scanning resolution of 300dpi:
300dpi = 300 rows / 2.54cm = 118.11 rows/cm
Let the scale of the scanned map be 1:25,000. Thus, one centimeter on the map is equivalent to 25,000cm in nature. Now let us calculate which distance in nature corresponds to the length of a raster cell:
distance in nature / scanned rows per cm = 25,000cm / 118.11 rows = 211.6 cm/row = 2.12 m/row
This value of 2.12m has to be entered as GRID RESOLUTION Grid resolution during the creation of the location . If you want the GRID resolution to be a whole number, you have to calculate backwards and change the scan resolution respectively. Normally, you should be able to chose this resolution freely up to a maximum value.