Note: This document is for an older version of GRASS GIS that will be discontinued soon. You should upgrade, and read the current manual page.
NAME
g.gui.gcp - Georectifies a map and allows managing Ground Control Points.KEYWORDS
general, GUI, georectification, geometry, GCPSYNOPSIS
Flags:
- --help
- Print usage summary
- --verbose
- Verbose module output
- --quiet
- Quiet module output
- --ui
- Force launching GUI dialog
Table of contents
DESCRIPTION
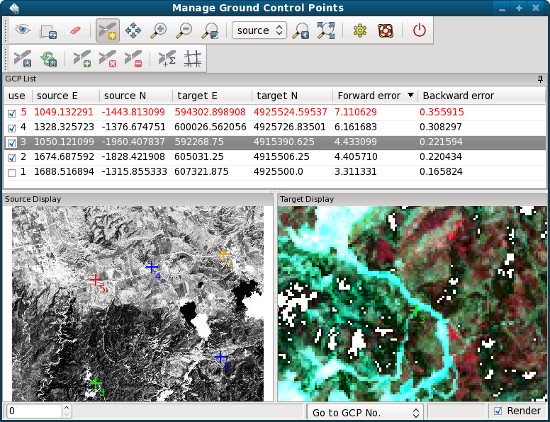
The GCP Manager is a wxGUI extension which allows the user to create, edit, and manage Ground Control Points. It is available from the menu "File | Manage Ground Control Points".The GCP Manager provides an interactive graphical interface to manage and analyze Ground Control Points. A backup copy of the initial POINTS file is always maintained and updated only on request (Save GCPs to POINTS file). This guarantees that accidental changes are not permanent and can be undone by reloading the Ground Control Points.
The GCP Manager must be started in the target location, not in the source location.
The GCP Manager is structured into three panels:
- The topmost panel shows a list of Ground Control Points. Tools to manipulate and analyze GCPs are provided in the toolbar. This panel can be moved out of the GCP manager window by either dragging with the caption or by clicking on the pin button on the right in the caption. This panel can also be placed below the map displays by dragging.
- The two panels in the lower part are used for map and GCP display, the left pane showing a map from the source location and the right pane showing a reference map from the target location. Numbered Ground Control Points are shown on both map displays.
Components of the GCP Manager
Toolbars
Two toolbars are provided with the GCP Manager, one for managing the map displays and one for managing the GCP list.
List of ground control points
The list of Ground Control Points can be sorted by clicking on a column header. Clicking on a cloumn header will sort the GCPs ascending, a second click on the same column will sort the GCPs descending. Overall RMS error and individual RMS errors of all points are often improved if the GCP with the highest RMS error is adjusted. Individual coordinates can be edited by double-clicking on a row.
The first column holds a checkbox and displays the point number. A GCP is only used for RMS error calculation and georectification if its checkbox on the left is checked. Uncheck to deactivate a GCP (mark as unused GCP).
Two panels for map display
The left panel is used to display a map from the source location, the right panel to display a map from the target loaction. Zooming in and out is always possible with the mouse wheel and done for each map canvas separately.
GCPs are displayed in different colors, depending on whether a GCP has a high RMS error, is currently unused or is currently selected. Optionally, currently unused GCPs are not shown on the map display.
Statusbar
At the bottom of the GCP Manager is a statusbar providing several functions. The default is set to Go to GCP No. (see also below). Typing a number or using the up/down arrows will center the maps on the given GCP, useful with a high zoom.
GCP Map Display Toolbar
 Display map
- Displays maps for source and target canvas and re-renders any layers that have changed since the last time the display was updated.
 Re-render map
- Re-renders both source and target canvas regardless of whether they have changed or not.
 Erase display
- Erases both source and target canvas to a white background.
 Define GCP (Ground Control Points)
- On left mouse click, coordinates are defined for the currently selected GCP.
 Pan
Pan- Interactive selection of a new center of view in the active display monitor. Drag the pan cursor while pressing the left mouse button to pan. Alternatively left-click on the new center. Panning changes the location of the region displayed but not the size of the area displayed or the resolution.
 Zoom in
- Interactive zooming with the mouse in the active map canvas (source or target). Drawing a box or just a left click with the mouse and zoom-in cursor causes the display to zoom in so that the area defined by the box fills the display. The map resolution is not changed. Clicking with the zoom-in cursor causes the display to zoom in by 30%, centered on the point where the mouse is clicked. Zooming changes the display region extents (both size and location of area displayed).
 Zoom out
- Interactive zooming with the mouse in the active map canvas (source or target). Drawing a box or just a left click with the mouse and zoom-out cursor causes the display to zoom out so that the area displayed shrinks to fill the area defined by the box. The map resolution is not changed. Clicking with the zoom-out cursor causes the display to zoom out by 30%, centered on the point where the mouse is clicked. Zooming changes the display region extents (both size and location of area displayed).
 Adjust display zoom
- Source and target display are adjusted by using the current GCPs for
coordinate transformation:
- Adjust source display to target display
- The extents of the source display are adjusted to the current extents of the target display.
- Adjust target display to source display
- The extents of the source display are adjusted to the current extents of the target display.
- Set active map canvas
- Sets the currently active map canvas (source or target). Click to set active map canvas for Return to previous zoom or Zoom to extent of currently displayed map. Alternatively, move the mouse over the map canvas to be used as active canvas.
 Return to previous zoom
- Returns to the previous zoom extent. Up to 10 levels of zoom back are maintained.
 Zoom to extent of currently displayed map
- Zoom to the extent of the currently displayed map in the active map canvas (source or target).
 Settings
- Shows a settings dialog for GCP management and display:
- Symbology
- Settings for map and GCP display:
- Highlight highest RMS error only
- Only the GCP with the highest RMS error will be displayed in a different colour, both in the list of GCPs and the GCP Map Display.
- Factor for RMS error threshold = M + SD * factor:
- All GCPs with an RMS error larger than mean RMS + RMS standard deviation * this factor will be displayed in a different colour, both in the list of GCPs and the GCP Map Display. As a rule of thumb, GCPs with an RMS error larger than M + SD * 2 are most probably wrong. GCPs with an RMS error larger than M + SD * 1 are worth closer inspection. This option is only available if Highlight highest RMS error only is unchecked.
- Color
- Set the color for GCPs on the GCP Map Display.
- Color for high RMS error
- Set the color for GCPs with a high RMS error on the GCP Map Display.
- Color for selected GCP
- Set the color for the currently selected GCP on the GCP Map Display.
- Show unused GCPs
- If unchecked, unused GCPs will not be shown on the GCP Map Display.
- Color for unused GCPs
- Set the color for unused GCPs on the GCP Map Display.
- Symbol size
- Set the symbol size for GCPs on the GCP Map Display.
- Line width
- Set the line width for GCPs on the GCP Map Display.
- Select source map to display
- Select a source map for the left pane of the GCP Map Display.
- Select target map to display
- Select a target map for the right pane of the GCP Map Display.
Rectification- Settings for georectification:
- Select rectification method
- Set the polynomial order for georectification. This order will also be used for RMS error calculation.
- Clip to computational region in target location
- Clip raster maps to the current computational region in the target location when georectifying.
- Extension for output maps
- Change the extension for output map names when doing the actual georectification.
 Show Help
- Show help page for the GCP Manager.
 Quit
Quit- Quit the GCP Manager.
Toolbar for the GCP list
 Save GCPs to POINTS file
- The current list of GCPs is saved to the imagery group's POINTS file and to a backup copy.
 Add new GCP
- Adds a new Ground Control Point to the list and selects it for editing.
 Delete selected GCP
- Deletes the currently selected GCP from the list.
 Clear selected GCP
- Resets all coordinates of the currently selected GCP to 0 (zero).
 Reload GCPs from POINTS file
- Reloads GCPs from the imagery group's POINTS file.
 Recalculate RMS error
- Recalculates forward and backward RMS error for all GCP marked for use (activated checkbox in first row).
 Georectify
- Uses i.rectify to georectify all images in the source imagery group.
GCP Map Display Statusbar
The GCP map display statusbar is similar to the statusbar in the regular GRASS GIS map display with two differences, Go to has been replaced with Go to GCP No. and Projection has been replaced with RMS error.If Go to GCP No. is selected, a GCP number can be given in the left side of the statusbar and the source and target map canvas will be centered on the given GCP. Clicking on the map canvas will update coordinates for this GCP.
If RMS error is selected, the overall forward and backward RMS error is displayed.
SEE ALSO
wxGUIwxGUI components
i.rectify, m.transform, v.rectify
See also video tutorials on GRASS Wiki.
AUTHORS
Markus MetzBased on the Georectifier (GRASS 6.4.0) by Michael Barton
Martin Landa, Czech Technical University in Prague, Czech Republic
SOURCE CODE
Available at: wxGUI GCP Manager source code (history)
Latest change: Saturday Jul 16 18:18:43 2022 in commit: 63e79c72f61149092b9546da4bc343cc581aa180
Note: This document is for an older version of GRASS GIS that will be discontinued soon. You should upgrade, and read the current manual page.
Main index | GUI index | Topics index | Keywords index | Graphical index | Full index
© 2003-2023 GRASS Development Team, GRASS GIS 8.2.2dev Reference Manual